Once seen as a plant reserved for seasoned gardeners, the orchid has become popular among houseplant lovers of all skill levels. That’s why knowing how to repot an orchid is useful, whether you’re just starting out or have years of experience.
Even though orchids are more common in homes, they still need a bit more attention than typical indoor plants. Without proper guidance, taking care of them can be tricky. These beautiful blooms are a bit delicate, so it’s crucial to learn how to repot them without harming their roots or leaves.
Table of Contents
ToggleWhen to Repot Orchids
It’s best to repot orchids shortly after bringing them home and continue to do so every one to two years. Hold off on repotting until the flowering period is over to keep those gorgeous blooms intact. Since most orchids bloom in the early months of the year, late spring or early summer is usually a safe window for repotting.
Signs an Orchid Needs Repotting
Like other houseplants, orchids can eventually outgrow their pots or become so large that they tip over. But it’s great news that your orchid is doing well and growing strong! Even if your plant has been thriving, there are a few clear signs that it’s time for a fresh pot.
Outgrowing the Pot
If you spot white roots poking through the drainage holes, it’s a clear sign your orchid has outgrown its current home. Likewise, if the plant looks like it’s being pushed out of its pot due to crowded roots, it’s time to move it to a larger container.
Signs of Root-Bound
Tightly packed, tangled roots are another clue your orchid needs repotting. While orchids naturally grow with overlapping, twisting roots, the root ball shouldn’t look knotted or feel stiff. If it does, your plant has become root-bound and needs more space to thrive.
Potting Mix Quality
Also, pay attention to the state of the potting medium. Unlike standard potting soil, the orchid mix is filled with chunky elements like bark and sphagnum moss that allow airflow and proper drainage. Over time, these materials break down into finer particles, which can hold too much moisture. When this happens, it’s time to refresh the mix to keep your orchid’s roots healthy.
How to Repot an Orchid
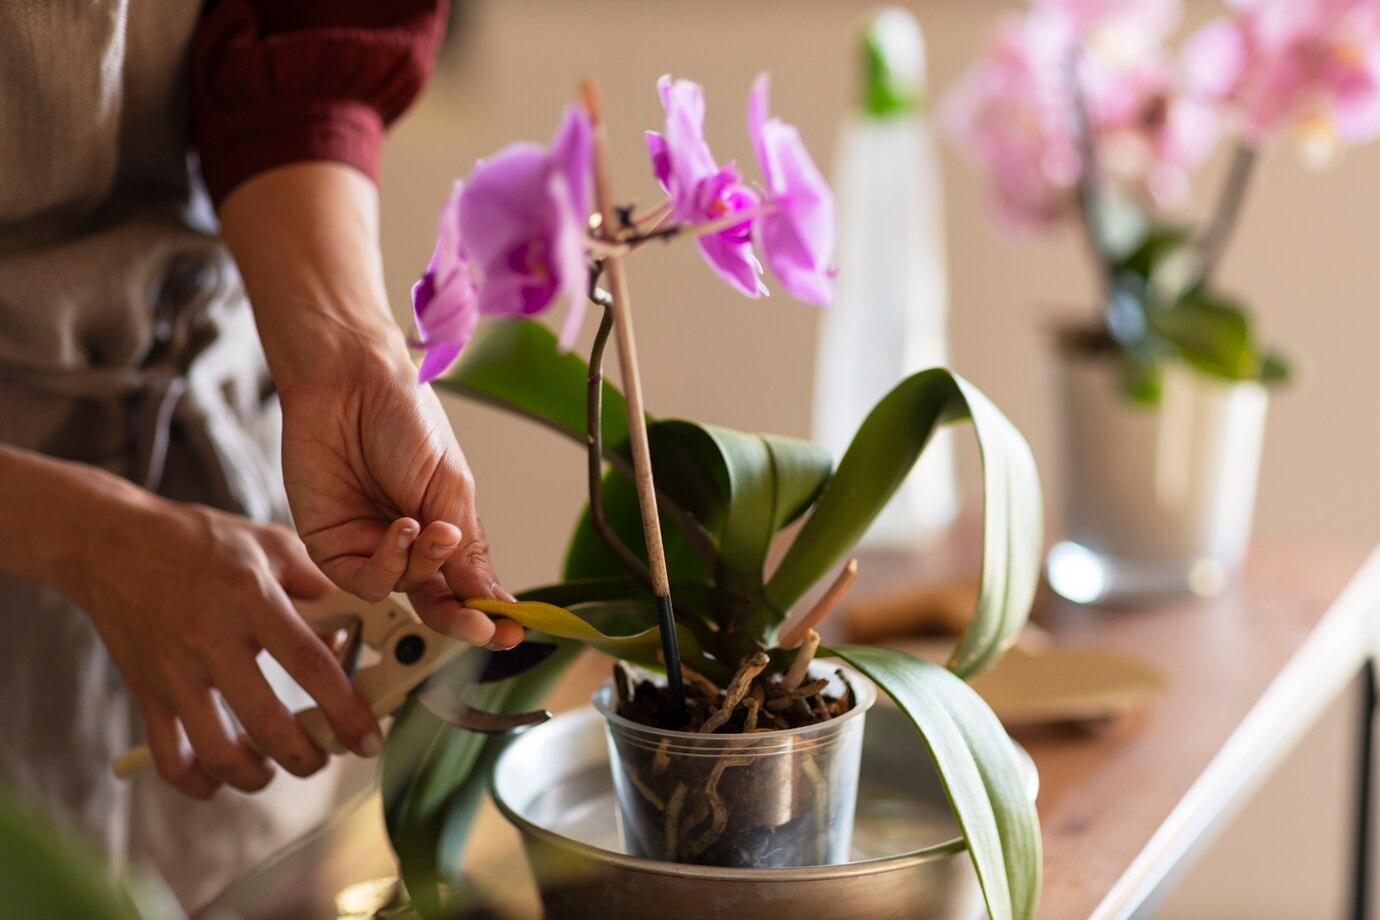
Once you’ve determined your orchid is ready for a larger pot, it’s time to prepare for repotting. Start by thoroughly watering your orchid a day in advance. It helps reduce stress during the transition. Right before you begin, make sure to wash your hands and sterilize any cutting tools like scissors or pruners. This step is important to prevent the spread of disease between plants. After that, you’re all set to follow the steps for repotting your orchid.
What You’ll Need
Tools
1 pair of pruners or scissors
1 trowel or soil scoop
Materials
1 clean container with drainage hole
1 bag orchid potting medium
Instructions
- Gently remove the orchid from its pot by holding it close to the base, near the roots. Avoid tugging on a single leaf, as it may snap or tear.
- Gently loosen the root ball and shake off as much of the old potting mix as possible. Be careful not to damage the roots in the process.
- Next, inspect the roots and snip off any that appear dead or unhealthy. These will usually look mushy, shriveled, or have turned brown or black.
- Set the orchid into its new container, making sure the base of the leaves rests about an inch below the pot’s rim.
- Pro Tip: Pick a pot that’s 1 to 2 inches wider than the current one. You don’t need a fancy orchid-specific pot. While those with extra holes improve airflow, regular plastic or terra-cotta pots work just as well for most orchids.
- Add fresh orchid mix around the roots, tapping the pot gently on a table to help the bark or moss settle evenly. Keep filling until the roots are surrounded.
- Press down the top layer of the potting mix so the plant is securely anchored in place.
- Finally, give your repotted orchid a deep watering. If you’re using a saucer, drain any extra water to prevent root rot.
How to Care for Your Orchid After Repotting
Once your orchid is settled into its new home, you can return to your usual care routine. Place it somewhere it receives bright, indirect sunlight, and water it when the potting mix is nearly dry. Many orchids won’t need repotting again for another year or two, so you can relax and enjoy the blooms before repeating the process.
Light Requirements
To help your orchid thrive, aim for an area with plenty of natural light. A clear, south-facing window works best for most varieties. Meanwhile, medium- and high-light orchids also do well on west-facing or lightly shaded south-facing windowsills. If you’re growing a low-light orchid, an east-facing window is ideal, while plants near a north-facing window may benefit from supplemental lighting to encourage blooms.
Best Indoor Orchids to Grow
While most orchids kept indoors are tropical epiphytes, some types are more beginner-friendly. Great options for indoor gardeners include:
- Phalaenopsis (Moth Orchid)
- Oncidium (Dancing Lady Orchid)
- Dendrobium (Cane Orchid)
- Cattleya (Corsage Orchid)
- Paphiopedilum (Slipper Orchid)